![[ Table of Contents ]](../gx/indexnew.gif)
![[ Front Page ]](../gx/homenew.gif)
![[ Linux Gazette FAQ ]](./../gx/dennis/faq.gif)
There is no doubt: GIMP not only is one of the applications that serves as an attractor for Linux desktop-users, but also one of the most powerful graphic applications available. There's hardly any task that cannot be done with the aid of the GIMP. One of its main features is modularity: programmers can extend the program with C programs called ``plug-ins''. Just open your right-mouse-button popup-menu, point to ``Filters'' and its diverse submenus, and you'll see how important the plug-in feature is for GIMP: all Filters seen here are implemented via plug-ins.
What about the next item in the popup menu, ``Script-Fu''? Tons of effects can be discovered here. The difference between Script-Fus and true filters is that Script-Fu-effects are generated by the aid of so called ``Scheme-Scripts'', small programs written in a strange-looking language called ``Scheme'', which is strongly connected with Lisp--some of you have certainly heard this name in connection with artificial-intelligence programs. GNU Emacs uses Lisp as an extension and implementation language, and GUILE, the GNU Projects Ubiquitous Language for Extension that can be embedded into all kinds of applications, is a Scheme dialect. Why does the Gimp as an end-user-application use such a complicated language? This question may be the source of a great religious and philosophical debate about programming languages on which some people can spend days and months. The religious explosive force lies shortly behind the question about which text editor to use and the world's end. Perhaps one can sum up the whole discussion with a simple sentence: Lisp and Scheme are powerful, flexible and elegant languages, but they are certainly not easy to learn for the unexperienced user in contrast to more ``conventional'' languages. Nevertheless, Script-Fu is a powerful means of expanding GIMP's functionality with shortenings for often needed operations and doing automated picture processing and image generation--features not only useful for the end users, but also for web designers and publishers. Just think of your home page using tons of graphical buttons with the same look: you'd have to do the same steps over and over for every button, and sooner or later this will become very boring and tiring. Scripting automizes the process so that you'll only need to enter the text of the button (and maybe the color and other things), and GIMP generates them automatically for you with the aid of a Script-Fu script.
As you can see, scripting is a powerful feature that can be useful for all kinds of jobs. To make writing scripts easier, Marc Lehmann set out to write extension software for GIMP which is already contained in the 1.1.x developers versions and may be used for the stable 1.0.x-tree of the GIMP: He implemented an interface to make it possible to write GIMP scripts using the Perl language. I will not start another discussion about the qualities and weaknesses of Perl here, but in fact the language is much easier to learn than Script-Fu if you have no programming experience. Too, and this is the main advantage in my opinion, most cgi-scripts and web-based programs are written in Perl, so many people already know the language.
Perl Interpreters are available with all Linux distributions I know, because Perl has become one of the important components of a UNIX System, so normally there's no need to install it separately. If you use the stable version of GIMP (1.0.x), then the GIMP-Perl package needs to be installed first. See the box below on how to do this. If you want to use interactive scripts, a language binding between Perl and the GIMP toolkit gtk must be added to the system, too, so that the corresponding features are accessible. The instructions on how to do this are contained in the installation box as well.
Enough of theory--lets take a tour of the small GIMP-Perl script below to see how the system works. (text version of this listing)
#! /usr/bin/perl
# Simple script to demonstrate the basics of gimp-perl
use Gimp;
use Gimp::Fu;
register "colored_canvas",
         "Creates a colored canvas",
         "This script creates a canvas pattern over a color gradient<\n>,
         "Wolfgang Mauerer",
         "wolfgang\@mynetix.de", # @ must be written as \@ in a perl string
         "0.0",
         "<Toolbox>/Xtns/Script-Fu/Patterns/Color Canvas",
         "",
         [],
         sub {
	     my $image = new Image(640, 480, RGB);
	     # Set new selections for the fore and background-color.
	     Palette
	     Palette
	     my $layer = $image->layer_new(640, 480,
                                           RGB_IMAGE,
					   "Color Canvas",
                                           100, NORMAL_MODE);

	     # Create a color gradient with the choosen colors.
	     Gimp->gimp_blend($layer, 0, 0, 0, 100, 0, 0, 0, 0, 0, 0, 0,
                              639, 379);
	     # ... and apply the canvas filter
	     Gimp->plug_in_apply_canvas(1, $image, $layer, 0, 10);
	     $image->add_layer($layer, 0);

	     return $image;
	 };
exit main;
The first line of the script, #! /usr/bin/perl, has
nothing to do with
GIMP or Perl--it is just a shell command that starts Perl to
interpret the commands contained in the file. You might already know
this construction from shell scripts.
The first lines interesting for use are use Gimp; and use Gimp::Fu;, as they initialize the GIMP binding and enable its usage. If you use these lines in your Perl scripts, you'll be able to refer to nearly all of the GIMP's functionality in your Perl scripts.
One central part of creating a new script is registering it within GIMP. In GIMP-Perl, this task is taken over by the function register, which expects numerous arguments as parameters. The script is described by them so that other users can get an idea of what the script does through a textual description, and on the other hand, the script is presented to the internal structures of GIMP so that it can be executed in the right way. The arguments have the following meanings:
If you get an error message like ``Command not found'' or so (depending on the shell you use), then you should check where your perl binary is located by typing whereis perl and adjust the #! line to the correct location. If you get error messages from Perl, double check your script's code with the code shown here and try to fix the typos.
Works quite fine, didn't it? But one thing seems to be mysterious: When calling the register function, we set a location within gimp's menu structure for the script, and according to the line
<Toolbox>/Xtns/Script-Fu/Simple/Color Canvasone normally would have expected the script to appear somewhere within the Xtns-menu. The reason why the script is not yet installed permanently is simple: we just used some kind of test mode, a clever feature of GIMP-Perl that enables the quick testing of new scripts. Normally, a script has to be installed so that it may be used permanently within the GIMP. By starting the Perl server, we receive the ability of testing the script directly on the command line and getting the same results as a normal, installed module. Another huge advantage of the Perl server is that you can modify your script as often as you want and then immediately restart it. When you install a script permanently, you have to reinstall it whenever you change it. And worse, each time a script is newly installed, you'll have to restart GIMP. Debugging or improving a script would really be time consuming with this method, but with the help of the Perl server, everything works just fine, and the turnaround time becomes much slower.
When you are sure your script works as expected, you may integrate it into GIMP using the gimptool utility. Our little script, for example, would be installed executing the line:
gimptool -install-bin simple_fu.plThe script is only used in your user-related GIMP configuration--other users won't be able to access your script that way. If you want all users to be able to profit from your work, you'll have to type:
gimptool -install-admin-bin simple_fu.pmas this installs the script globally on your machine. You need to have root privileges for doing this.
After installing the script, you can see a new menu point in Xtns -> Script-Fu -> Patterns with the name ``Color Canvas''. Select the menu point to execute the script, and you'll get the same window as you did when calling the script directly on the command line: our red-blue canvas.
With a quite simple script, we have created an image that would take at least several hundred lines of code without GIMP. Because we could use predefined functions (like GIMP-blend) and already existing plug-ins (apply_canvas), we were able to do the whole job with very little coding required.
As you certainly might expect, GIMP is built on the basis of a huge number of functions and procedures, and a great number of them can be used within scripts--never mind whether you write them as a plug-in in C, as script-fu-scripts or with GIMP-Perl. How can one easily keep track of this big functionality without reading GIMP's source code and studying all the scripts and plug-ins? As we've already seen when registering our first script within GIMP, every new component which can be used by other GIMP users/programmers needs to have descriptive texts associated with it. All the basic functions, as well as all plug-ins and scripts shipped with the GIMP by default, have such descriptions, too. The central access point for all available functions together with their parameters and descriptions is the DB browser, an interactive catalogue that aids you in developing scripts.
The DB browser can be started by selecting the menu point ``DB Browser'' from the Xtns menu. A dialog window as shown in Figure 1 appears on your screen.
The best thing to do if you want to work with GIMP-Perl is use one of the developer versions of GIMP (1.1.x). You can get it from one of the GIMP mirrors, just take a look at http://www.gimp.org/. Installing the package for GIMP 1.0.x requires a little more work. First, you'll have to get GIMP-Perl and Gtk-Perl (at least version 5.0120) from any CPAN mirror (http://www.cpan.org/). You need to unpack the tar files with the commands:
tar xzfv Gtk-Perl-0.5120.tar.gz
tar xzfv Gimp-1.098.tar.gz
Move to the newly created directories and in each type:
perl Makefile.PL
make
make test
make install
If Gtk-Perl doesn't work and GNOME is not installed, you may have to type:
perl Makefile.PL --without-gnome
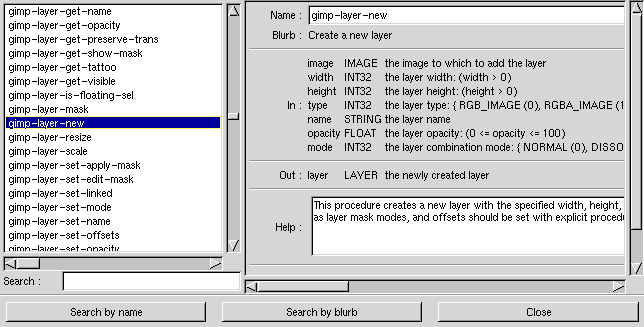
In the left part of Figure 1 is a list box with many function names--the GIMP's functionality is really enormous. When you select a function from the list, several kinds of information about it appear on the right side of the window: the functions name, a blurb (we've heard that before--it's the GIMP's name for a short descriptive text), a help text and--most important--the parameters needed to execute the function correctly. When you see one or more lines headed by ``Out:'', the function not only has input parameters, but also returns some computed values. The gimp-layer-new function, for example, takes a long list of parameter values and returns a new layer. We've used the function in our small example script, feeding it with the equivalent values and getting back a new layer which was assigned to the variable $layer.
Obviously, the buttons ``Search by name'' and ``Search by blurb'' allow you to search either the function name or the short description for a piece of text. Do a search by name for the string ``canvas'', and you'll get to GIMP functions with the word ``canvas'' in their name. Select plug-in-apply-canvas and see what parameters were used for the function in our script.
If you look at the function names exactly, you will see a very important detail: while all the functions listed in the database have normal dashes(-) in their names, their counterparts in the Perl-script used underscores (_) for this purpose. While Scheme (and Lisp) usually take the - as an optical-separation symbol, Perl uses the _ convention. The effect of this is your scripts get more consistent with other Perl code and thus are easier to read and understand by programmers other than you. So when you look up functions in the DBB (an abbreviation for database browser), don't forget to replace the dashes by underscores in your Perl program.
In some functions, constants may be used as parameters because descriptive names are easier to remember for than numbers. Pay attention when using such constants, because GIMP-Perl replaces the dashes by underscores here, too.
The DBB is a powerful tool to aid you in script development, but it's not the only one available within the GIMP. The alternative one is the PDB, the Procedural Data Base Browser. Both show the same functions, but present them in a different manner. You can start it by selecting the appropriate entry from the Xtns menu. As you can see, there is a GIMP-Perl logo in the upper-right corner. The tool is therefore not a script-fu tool, but natively written for GIMP-Perl. In the window's headline, you can see that the browser is still an ``early alpha version'', so be prepared that things may change. Nevertheless, PDB is already a very good helper when creating GIMP-Perl scripts.
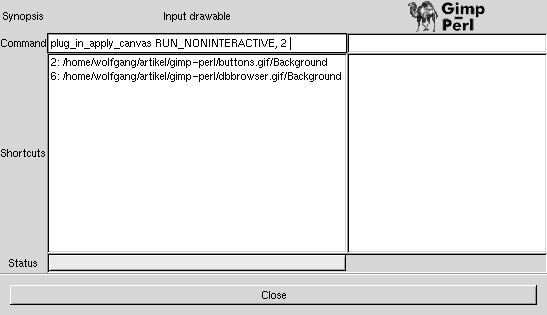
The whole thing works like this: in the ``Command'' text-box, you type in a function name, and all functions containing the substring are shown in the box below. You can either continue typing until there's only one solution left (insert it by pressing F2), or select a function name from the list. Select, for example, plug_in_apply_canvas. When you press space after the function name, the PDB will prompt you for the first parameter of the function, simultaneously presenting a list of valid alternatives. Again, you can choose one from the list or type in the parameter via the keyboard (completion by F2 works too). The whole game runs again until all needed parameters for the function call are selected. A nice thing for functions with 10,000 parameters is the status-bar at the bottom of the window which shows how the percentage of those completed.
When used in conjunction, PDB and DBB are two very useful tools to aid you in script development.
According to Larry Wall and Randal Schwarz, a programmer has three main virtues as they state in Programming Perl: laziness, impatience and hubris. But why do I tell you this when talking about GIMP? Take a look at the function calls: aren't they really too long for a lazy and impatient programmer? Always GIMP->gimp_... before a simple call can be boring. GIMP-Perl introduced some kind of shortenings for this problem. When you look at the GIMP's functions, you find they all fit into a certain category that is deduced from their heading: all functions starting with gimp-palette- have to do with palette operations, layer functions have the string gimp-layer- in front of their function name, and so on. As GIMP-Perl uses Perl's-object oriented syntax much typing can be saved by using the shorter forms for these Operations, with the side effect that your scripts will be much easier to read and understand. If, for example, you have an image-object ($image in our example), you can use the gimp-image--functions directly by appending them to the object. Gimp->image_add_layer($image, $layer, 0) becomes $image->add_layer($layer, 0) by this. $image isn't needed as a parameter any more since it is clear to which image the layer will be added.
Another possibility for shortening your scripts is using the kind of abbreviations as you can do with palette operations. Instead of writing Gimp->palette_set_foreground(...) you may simple use Palette->set_foreground(...).
To see what kinds of abbreviations are possible exactly, take a look at the Gimp/Fu man page by typing man Gimp::Fu (if that doesn't work, try perldoc Gimp::Fu).
Programmers are just humans, so they tend to make errors in their programs. The situation with GIMP-Perl is exactly the same, but with a ``special extension'': you can, on the one hand, create erroneous Perl code and, on the other hand, call GIMP's function in the wrong manner.
The Perl interpreter helps us to fix things falling into the first category be displaying corresponding error messages, but what about our errors originating from the GIMP? Imagine we were calling one of the internal GIMP functions with the wrong set of arguments. Although the number of parameters is right, one or more may have values that are out of range. The only message issued is something like procedural database execution failed at file name line line_number. That's not very much information.
Tracing is a way to get more precise messages about your running script. Simply insert Gimp::set_trace(TRACE_NAME) into the header of your subroutine, and you'll get a list of all called functions together with their arguments. For our simple script, the output to STDERR will look like Listing 2 (the lines were split up in several parts because they are very long in the original output). It is possible to fine tune the information given in a trace with the parameter of the set_trace call. In our example, we have used TRACE_NAME, but there are other possiblities:
| Option | Output Information |
| TRACE_NONE | No tracing output at all. |
| TRACE_NAME | Print all the executed functions together with |
| their parameters as shown in the previous examples. | |
| TRACE_DESC | Print the function description from GIMP's |
| internal database: All parameter names, their | |
| description and the possible values for them. | |
| TRACE_ALL | Print all informations available. |
gimp_image_new(width=640, height=480, type=0) = (image=7)
gimp_palette_set_foreground(foreground=[255,0,0]) = ()
gimp_palette_set_background(background=[0,0,255]) = ()
gimp_layer_new(image=7, width=640, height=480, type=0, name="Color Canvas",
opacity=100.000000, mode=0) = (layer=16)
gimp_blend(drawable=16, blend_mode=0, paint_mode=0, gradient_type=0,
opacity=100.000000, offset=0.000000, repeat=0,
supersample=0, max_depth=0, threshold=0.000000, x1=0.000000,
y1=0.000000, x2=639.000000, y2=379.000000) = ()
plug_in_apply_canvas(run_mode=1, image=7, drawable=16,
direction=0, depth=10) = ()
gimp_image_add_layer(image=7, layer=16, position=0) = ()
Let's demonstrate the features of GIMP-Perl shown by now in a more complex than the first. Did you ever create a home page that uses graphical buttons? Then you certainly know that for each button the same operations have to be applied all the time--the perfect situation for a GIMP-Perl script.
The thing we are working on are buttons with a text component centered in their middle (variable fonts and sizes should be usable), bordered by a frame that looks like it has been carved into your desktop. If you've already worked with a program using Sun's new Java metal layout, you might already know this. Gtk, too, offers the rendering of buttons according to such a scheme.
Before we start writing our script, we must think about the steps that need to be done first. We need three layers: one for the background, one for the border and one for the text. The border and text layers must be transparent and therefore need an alpha channel.
As the font name, size and button text need to be user-configurable, we must pass them as parameters to the script. When you apply existing script-fu-scripts: dialog boxes for the various settings appear before the script is actually run. The same thing is possible with GIMP-Perl: When registering the function, we just need to say what kind of user customizable arguments the script needs, and the dialog where the parameters values can be entered is generated and shown automatically when the script is executed. All these parameter definitions have to be put inside the square brackets that already appear in the register of the first example. The line describing a parameter also needs to be put into square brackets. For our new script, this would look like:
[
 [PF_STRING, 'text', 'The button's text.',""],
 [PF_FONT, 'font', 'Font used for the button's text label.'],
 [PF_BOOL, 'flat', 'Flatten the image and convert it to indexed]
]
Experienced Perl users know that a reference to an array containing array references is passed that way, but this is just a technical detail. The [] block describing the argument is always structured in this way:
[PF_TYPE,name,description,default value(optional),other values(optional)]PF_TYPE sets the type of the argument. This is important because the input methods differ for the diverse data types: a font selection is done via a font selection box, while string are entered in a text box. Boolean (true/false) values will be entered using a simple check box. The possible values for PF_TYPE are documented in the Gimp/Fu-man page. As the number of input types is quite large, we won't cover them all here--just take a look at the man page. (In fact, it would be quite difficult to write a script that needs parameters of all types available.)
name will precede the actual input element as a descriptive text; description will show up as a tool tip (appears when you place your mouse over the selection widget and do not move it for some time).
The default setting for a parameter to be usable should supply safe ``base-values'' to a script--or set parameters to their optimal values for the best look to give a good starting point.
The other values have different meanings for the different parameter types, but we won't use them here.
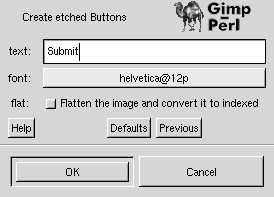
What else will we need to create the button? A routine to draw the frame would be quite handy, and we'll implement this as a Perl subroutine that calls the corresponding GIMP functions to paint four lines with the aid of the pencil tool. The script is shown in Listing 3. As you can see, the subroutine used for controlling the creation of the button is no more an anonymous one like in the simple example, but a true Perl subroutine. Therefore, we'll have to use &create_etched_button to pass a reference of the subroutine to the register function.
Our third argument to the script has to name flat. When it is selected, all layers of the image will be merged together and the resulting layer will be converted to the ``indexed'' color format. The image may be saved in the gif format.
The general outline of the script should be clear now, as the structure doesn't change too much from our simple example except that we now have parameters and the subroutine is a real Perl subroutine. One thing that still needs to be explained is how the text layer is created.
Font and size for the text have been selected by the user and can be found in the string $font. It's format is called X logical font description and looks like:
-Adobe-Courier-Medium-R-Normal-14-140-75-75-M-90-ISO8859-1Quite complicated. But that's no problem: we can use that string directly as an argument for gimp-text-fontname, a function that creates a new layer containing a specified text string. The function needs both the font name, and the font size. It is contained in the font string and can be extracted from it via the function xlfd_size provided by GIMP-Perl.
Drawing the two overlaying frames that create the etched effect is done by the Perl procedure draw_frame which is not exported into the GIMP's database and therefore can be used only in our script. It draws four lines, based on the knowledge of where the upper-left and lower-right corner of the box are located. The settings for color and brush are not changed; the procedure operates with the settings active when it is called.
If the flat flag has been set ($flatten is 1 then), additional actions take place: the layers are merged together, and the image is converted to index colors, suitable for saving as a gif file.
For the user's convenience, the back and foreground colors from the palette are restored to the settings before the script's execution. Then we return the picture to the GIMP, and a new window containing a graphical button shows up. You won't see the etched effect too much here, but try putting the button in a web page--it will look like Figure 4 shows.

If you like the script, you may install it with the gimptool command as demonstrated in the simple example. A new entry called ``Etched'' shows up in Xtns -> Script-Fu -> Buttons then.
![]()
![]()