|
|
|
| This article is available in: English Castellano Deutsch Francais Nederlands Russian Turkce Arabic |
![[Photo of the Author]](../../common/images/PhilipGroot.jpg)
by Philip de Groot About the author: Soon, he will get his Ph.D. at the University of Nijmegen on the subject of chemometrics. He enjoys working with Linux and writes down his experiences on a regular basis. Content: |
![[Illustration]](../../common/images/article178/image_art178.jpg)
Abstract:
This articles shows how to record music with Linux. In contradiction to the LinuxFocus tip of January 2001, not the 'expensive' WAV-format is used. Instead, the much smaller mp3-format is directly recorded. 24 hour recordings in CD-quality become reality when using this format.
IntroductionUsually, it is impossible to directly convert wave-sound to mp3-sound in real-time. The procedure that one should follow is:
Recording a wave-file quickly takes up quite a lot of disk space (100 MB for 10 minutes of stereo music in CD-quality). This restricts the storage capacity for music recorded in this format. An mp3-encoder is capable of converting the wave-file of 100 MB to 10 MB in the standard mp3-quality (128 kbps, stereo). This property enables the digital recording of music for 24 hours, without any interruption! 24 hours is 60*24 = 1440 minutes, using only 1,4 GB (1440 MB) hard disk space!!! I have used this feature to record the eighties top 300, transmitted by Loostad radio (some English pages are also available). The recording was interrupted just once, the mp3-recording program stops automatically after 24 hours and this was not documentated..., the recording was very good! I will show you what software I used and explain alternative ways to make real-time mp3-recordings. I have as well made the software used for this article available on seperate page (links are further down in the article). |
'Mpegrec' does the same as 'sox | lame', but different settings are already defined. The user does not need anything else. Just installl 'Lame'! I advise you to use 'mpegrec'. However, keep in mind that this program stops after 24 hours!!! Furthermore, an annoying casting-bug results in erroneous recording times: the recording time as set by the user is not correctly used. Most of the times, it is quite a lot shorter!
| -b | Use 128 kbps as the mp3 bitrate. The standard value in 'mpegrec' is 192, which is a strange (and much too high) value. Almost all mp3-files have a constant bitrate of 128 kbps. |
| -o | Name of the output file. In this example: ./test.mp3. If no output file is defined, everything is sent to the standard output ('stdout'). Usually, this is the xterm in which the program is executed. All mp3-codes are plotted on your screen instead of being stored in a file... |
Attention:
Please take care that your mixer-settings are set
correctly. If not, nothing will be recorded! The correct
recording-source should be selected and the appropiate volume-controls
should be at their highest settings.
| sox | The recording program: sound is recorded using the 'line-in' of the soundcard. |
| -t ossdsp | The sound input originates from the OSS sound drivers. These drivers are included with the Linux kernel if the standard sound support is included. |
| -w | Sample bit type is 16 bit long word (if you do not understand this: don't bother, it is not important). |
| -s | The 'sample data' is 'signed linear' (if you do not understand this: don't bother, it is not important). |
| -r 44100 | The sampling frequency is 44100 Hz (CD-quality). |
| -c 2 | Record from 2 channels (stereo). |
| /dev/dsp | This is the sound-sampling device: the Linux-device that delivers the recording data. All devices, ports, disks, and so on are accessed using the '/dev'-directory. The wave-stream is accessed in linux from '/dev/dsp'. As a matter of fact, it is even possible to get your soundfile using the following command: 'cat /dev/dsp >test.wav' (works only if the mixer-settings are correct!!!). |
| -t raw | The output is 'raw' data (unchanged, straight from the soundcard). |
| - | Use the standard output, symbolised by '-' |
| lame | The encoder program: the recorded sound is piped to 'lame' for the mp3 conversion. |
| -x | 'Force byte-swapping of input'. I do not know the precise function of this option, but without it the procedure simply does not work (before I found this out!). |
| -m s | Encode as stereo mp3-file. Standard, 'lame' encodes it as 'joint-stereo': only the DIFFERENCES between both sound channels are encoded. As a result, a higher compression is obtained, but the mp3-quality is poorer. |
| - | Input is 'stdin'. This is correct for the current example. |
| ./test.mp3 | The name of the final mp3-file. |

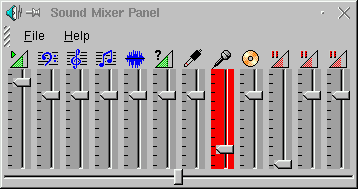
Figure 1 depicts that the microfone is the current recording-source.
For our purpose, an external source is connected to the computer using
the 'line-in' connector on the soundcard. The recording-source should
be the 'line-in'. If the mouse-pointer is positioned on the line-in
channel of the KDE-mixer, a right-click results in the menu that is
depicted in Figure 2:

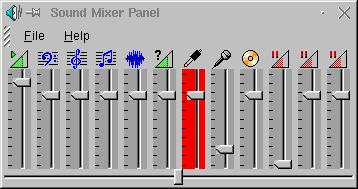
Off course, 'RecSource' is selected to set the 'line-in' of the soundcard as the recording-source. Use the same procedure to turn the microfone off as a recording-source: you do not want to have the additional noise!

Figure 3: The KDE-mixer is set correctly.
The remarks above indicate that recordings can be obtained best if
no graphical environment is present. This means that the Bash-shell
should so used (a text-based shell). This approach has some
consequences:
These two problems can be solved quite easily. The first problem,
sound support, is solved as follows:
'modprobe -k sb'
This command loads the module 'sb', which installs my soundcard (a SoundBlaster AWE 64). If you do not know which module should be installed, please look in your '/etc/conf.modules' (SuSE) or '/etc/modules.conf' (depending on your distribution). For me, the soundcard part is the following:
The second problem is selecting the 'line-in' on your soundcard with a
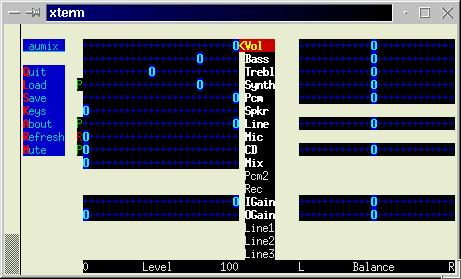
text-based mixer-program. I use the 'aumix' program. If in Bash the
command 'aumix' is executed, the mixer starts in interactive mode. In
this mode, settings can be checked and changed in a glance, see Figure
4.

You can select the different recording sources with the arrow buttons. The '<' or '>' buttons selects the volume (left) or the balance (right). The '+' and '-' buttons increases and decreases the volume of the currently selected source. 'm' mutes or unmutes the current source. If the current source is selected as recording source, a red 'R' is displayed on the left of this volume source. If the source only can be used for playback, a green 'P' is displayed. Pressing 's' saves the current settings in '~/.aumixrc'. These settings are activated very easily on the next startup with the command: 'aumix -l'.
To automate the above procedure, I have written a small script:
'./mrec test.mp3'. This script contains the following lines:
#!/bin/sh
if [ -z "$1" ]; then
	echo "Usage: mrec mp3-output-file"
	exit 0
fi
modprobe -k sb
aumix -l
mpegrec -b 128 -o "$1"
The 'lame'-files and installation tips can be found here.
The lines that do not have a '#' should get one now. You do not need these extra options!
mv /usr/sbin/cron /usr/sbin/cron.backup
It is likely that the location of 'cron' differs for other Linux distributions. You can find the location of 'cron' with the following command:
which cron
Please check whether 'cron' is needed for other tasks! On a desktop Linux machine, this should not be a problem.
|
|
Webpages maintained by the LinuxFocus Editor team
© Philip de Groot, FDL LinuxFocus.org Click here to report a fault or send a comment to LinuxFocus |
Translation information:
|
2001-04-27, generated by lfparser version 2.13